Making OSPi Its Own LAN Access Point
This document describes how to set up an “ad hoc” network on your Open Sprinkler Pi (OSPi) device. This type of network allows you to manage your OSPi without the need of a dedicated router or pre-existing netowork. You install and configure certain software on the RPi that causes it to present it self as a network. This network appears as any other does on your mobile device or laptop, as show in this example from an iPhone:
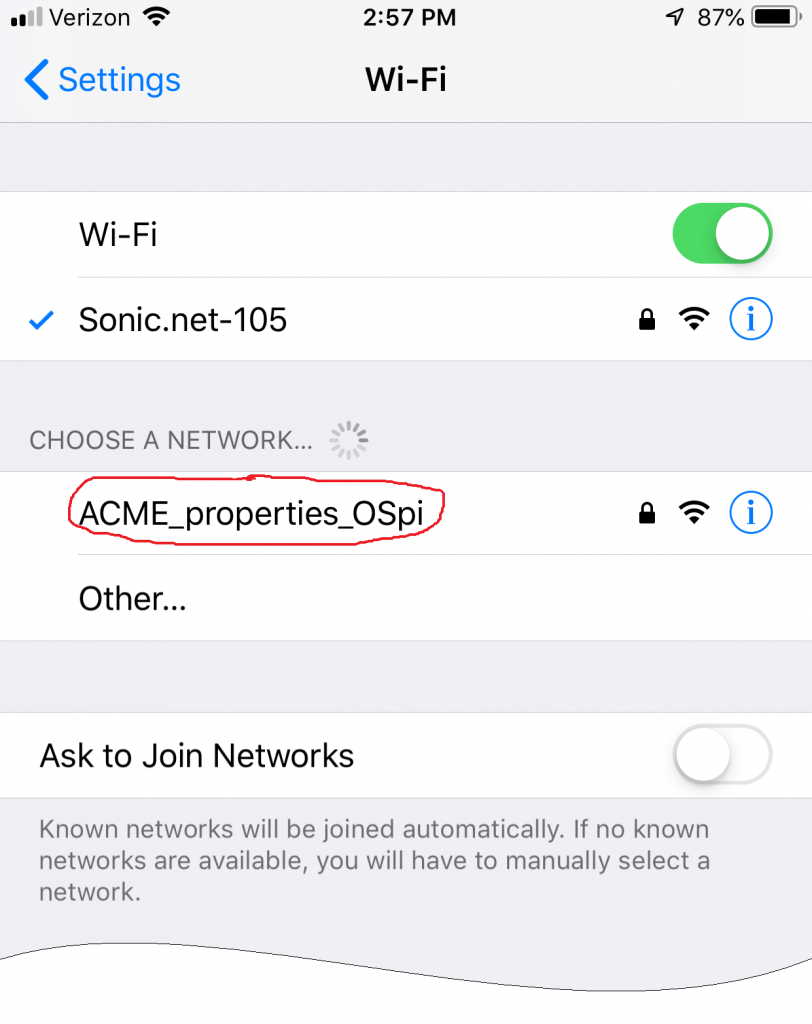
Once you connect to the network, you open the Open Sprinkler App (or Web UI if using a laptop) to administer Open Sprinkler.
Why would you do this?
Consider setting up an OSPi ad hoc network (we’ll call this the OSPi network) if:
- There is no available WiFi network. An OSPi network is useful in cases where there is no existing network
- The existing WiFi network isn’t useable. In some cases, an existing WiFi network isn’t practical to access. For example, you might have a rental property, whose grounds are watered by an OSPi system, and you don’t want the unreliability (or liability) of connecting the OSPi to the tenant’s WiFi network.
Why would you not do this?
Don’t set up a OSPi network if:
- You require remote administration. Ad hoc networks are by definition standalone. They aren’t connected to the Internet, and hence you can’t administer devices on them via the Internet. Similarly, you can’t have log files forwarded to you.
- You need frequent in-place software/firmware upgrades. You can’t easily upgrade/update the OSPi software when you have an OSPi network, since upgrades are normally conducted over the Internet. (This isn’t an important factor, though, since the current Raspian and Open Sprinkler code is quite stable.)
- The OSPi network would be out of range of an administering device. I’ve found that I can connect to the OSPi network (even one using a Pi Zero W) with my iPhone and laptop up to 50′ away, with several intervening house walls. However, you don’t believe you’re administering device will always be within range of the OSPi network when needed, then this setup isn’t likely for you.
Source material
All steps in the present OSPi network setup procedure below are directly distilled from this Stack Exchange Web page. This Web site has the only set of Pi ad hoc network configuration instructions I’ve found that works for the Stretch version of Raspian. This source site also has more explanations of commands that is presented in the present document, and additionally includes a useful troubleshooting section.
Note that there’s nothing in the present network setup instructions that’s Open Sprinkler specific. You can set up an ad hoc network for any number of purposes.
Requirements
Have the following requirements in place before proceeding.
Hardware
- An Open Sprinkler Pi (OSPi) board from Open Sprinkler.
- A standard 24VAC power supply for sprinkler valves.
- A Raspberry Pi (RPi). I’ve successfully set up a Raspberry Pi Zero W, but Pi versions 2 (with WiFi dongle) or 3 should work fine.
- A microSD card, 8GB or higher.
- A wired keyboard and monitor.
Software
- Raspbian Stretch Lite (Installed prior to these instructions)
- Random number tools (Installed in these instructions).
- git-core (Installed in these instructions).
Environment
- Access (at least temporary) to the Internet via WiFi.
- The microSD card has the Stretch version of Raspian installed on it, and the microSD card is installed in the RPi.
- The RPi is either:
- installed on the Open Sprinkler board, or
- temporarily freestanding. (You can install the RPi on the OS board at the end of the ad hoc setup.)
- The keyboard and monitor are connected directly to the RPi.
- The RPi is booted up. You can boot the RPi according to your preferred hardware configuration:
- If the RPi is attached to the Open Sprinkler board, connect the powered 24VAC adapter to the OS board.
- If the RPi is freestanding (for all but the final boot), connect powered 5V USB adapter to the RPi.
Information
- Have available the name (wpa-ssid) and password (wpa-psk) of the Internet-connected LAN.
- Have in mind a different name (wpa-ssid) and password (wpa-psk) for your OSPi network that you’ll configure. Note that the password should be at least 8 characters long.
- Nave in mind an IP address for the OSPi network access point. Normally it is 192.168.x.1, where “x” is a number between 1 and 254.
Set up the OSPi network
Perform the steps in the sections below to configure your OSPi network:
Log in as root
pi@raspberrypi:~ $ sudo -Es
pi@raspberrypi:~ #
(If you log in as root, , you can enter subsequent commands without the need to type “sudo” at the start.)
Localize the RPi
If you haven’t localized the RPi yet do so now. For example, change the English keyboard layout to one more suited.
Tip: Configure localization via the raspi-config utility:
pi@raspberrypi:~ # raspi-configConnect to an Internet access point
If you haven’t done so already, configure a connection a WiFi connection to the Internet. (This is a temporary setup to get required software.)
1] Open file /etc/network/interfaces with the nano text editor:
pi@raspberrypi:~ # nano /etc/network/interfaces2] Replace all text in the file with the following text, substituting ssid and password for your WiFi’s credentials. (Keep the quotes!).
auto lo

iface lo inet loopback
iface eth0 inet dhcp      #an optional line

allow-hotplug wlan0
auto wlan0
iface wlan0 inet dhcp
        wpa-ssid "ssid"
        wpa-psk "password"
3] Save and close the file. (Ctrl-x, y, Enter.)
4] Reboot the RPi:
pi@raspberrypi:~ # reboot -h now4] Verify that the RPi has connected to your router by displaying the network status:
pi@raspberrypi:~ $ sudo -Es     #log in as root
pi@raspberrypi:~ # ifconfig
If the RPi connected to the internet, the wlan0 section will include the line “inet w.x.y.z“, where w.x.y.z is the IP address of the RPi (as assigned to the RPi by you router).
Update/Install Software
Update Raspian
If you haven’t done so already, update Raspian with the usual commands:
pi@raspberrypi:~ # apt-get update
pi@raspberrypi:~ # apt-get upgrade
Install rng-tools and git-core
Install rng-tools and (if not already installed) git-core as follows:
pi@raspberrypi:~ # apt install rng-tools
pi@raspberrypi:~ # apt-get install git-core
Notes:
- rng-tools helps speed up the generation of random numbers for the “supplicant”.
- git-core enables you to download programs, such as the Open Sprinkler firmware, from the git hub.
Install the Open Sprinkler firmware
If you havn’t already done so, install the Open Sprinkler firmware. The steps below are taken from the OSPi documentation.
Note that the command starting with “git clone…” might appear word wrapped at the end. But be sure to type the entire text on one line.
pi@raspberrypi:~ # cd ~
pi@raspberrypi:~ # git clone https://github.com/OpenSprinkler/OpenSprinkler-Firmware.git
pi@raspberrypi:~ # cd OpenSprinkler-Firmware
pi@raspberrypi:~ # ./build.sh ospi
Enable journaling
pi@raspberrypi:~ # cd ~
pi@raspberrypi:~ # mkdir -p /var/log/journal

    # The following command might report a "Cannot set
    # file attribute..." error when executing.
    # You can ignore the error.
pi@raspberrypi:~ # systemd-tmpfiles --create --prefix /var/log/journal
Disable classic networking
pi@raspberrypi:~ # systemctl mask networking.service
pi@raspberrypi:~ # systemctl mask dhcpcd.service
pi@raspberrypi:~ # mv /etc/network/interfaces /etc/network/interfaces.orig
Insert text into file /etc/resovconf.conf:
pi@raspberrypi:~ # sed -i '1i resolvconf=NO' /etc/resolvconf.confConfigure systemd-networkd and systemd-resolved
pi@raspberrypi:~ # systemctl enable systemd-networkd.service
pi@raspberrypi:~ # systemctl enable systemd-resolved.service
Create a symbolic link
Create a symbolic link to file /run/systemd/resolve/resolv.conf:
pi@raspberrypi:~ # ln -sf /run/systemd/resolve/resolv.conf /etc/resolv.confConfigure wpa_supplicant as the access point
1] Open file /etc/wpa_supplicant/wpa_supplicant-wlan0.conf with the nano editor:
pi@raspberrypi:~ # nano /etc/wpa_supplicant/wpa_supplicant-wlan0.conf2] Enter the following text, but replace the text RPiNet and password with the OSPi network name and password you decided on in section Required:information above.
Important:
- Don’t put spaces before or after the “=” signs.
- Select a password that’s at least 8 characters long.
country=US          # Replace US with your contry acronym.
ctrl_interface=DIR=/var/run/wpa_supplicant GROUP=netdev
update_config=1

ap_scan=2
network={
    ssid="RPiNet"   # Replace RPiNet with the desired network name. Keep the quotes!
    mode=2
    key_mgmt=WPA-PSK
    psk="password"  # Replace password with the desired network password. Keep the quotes!
    frequency=2437  # See (*) below.
}
*For more information on the frequency value, see https://en.wikipedia.org/wiki/List_of_WLAN_channels.
3] Save and close the file.
4] Set privileges for file /etc/wpa_supplicant/wpa_supplicant-wlan0.conf:
pi@raspberrypi:~ # chmod 600 /etc/wpa_supplicant/wpa_supplicant-wlan0.confEnable the supplicant service
pi@raspberrypi:~ # systemctl enable wpa_supplicant@wlan0.serviceSet up a stand alone access point
1] Open file /etc/systemd/network/08-wlan0.network with the nano editor.
pi@raspberrypi:~ # nano /etc/systemd/network/08-wlan0.network2] Enter the following text, but replace the sample network access point IP address (192.168.4.1) with IP address you decided on in section Required:information above.
[Match]
Name=wlan0
[Network]
Address=192.168.4.1/24  # Replace with your desired IP address
DHCPServer=yes
3] Save and close the file.
Reboot the Raspberry Pi
Proceed according to the RPi’s connection during the setup:
- If you installed, the OSPi network with the RPi freestanding, shut it down, install it on the (unplugged) Open Sprinkler board, then connect the 24VAC power source to the OSPi.
- If you set up the OSPi network with the RPi installed on the Open Sprinkler board, simply reboot:
pi@raspberrypi:~ # reboot -h nowOpen the Open Sprinkler management interface
You should now be able connect to the OSPi network by selecting the network name in the list of networks displayed on your device. Then open the Open Sprinkler management interface using the IP address you specified (e.g., 192.168.10.1:8080):
If using a browser, just type in ipaddress:8080 into the URL field.
If using the OSPi App, specify the ipaddress:8080 in the Manage Sites screen.